Using ProVideLink. #
Login to the https interface
Right click on a file that you want to edit and click edit.

If ProVideLink is already installed, editing a file via the HTTPS interface should seamlessly integrate with your local editing software (ex. Word, Photshop etc.). When done editing a file, save it and ProVideLink will automatically upload the changes to the server.
If you’re new to using ProVideLink, you’ll need to install the ProVideLink software on your computer. Below are the installation instructions based on whether you’re using a PC (Windows) or a Mac.
Installing ProVideLink on a MAC #
The first time you attempt to edit a file using ProVide’s HTTPS interface, you will encounter a popup. Click on the “ProVideLink.pkg” link to download the ProVideLink software to your computer. Once the download is complete, navigate to the download location and run the ProVideLink.pkg file.


Click Continue.

Here, you have the option to change the installation location if you wish, but for this guide, we will simply click “Install.”

The ProVideLink Installer now requires administrative rights. Please use your fingerprint or enter your administrator password.

Once you see this screen, simply click “Close.”

You will now encounter this window, which you need to go through to grant the permissions ProVideLink requires to function on your Mac.
Click “Open System Settings”.

Enable ProVideLink as shown in the Picture above.
It will prompt you to enter the administrator login credentials again.
Simply enter them, and then close the System Preferences window.

Click Request permissions on Step 2.

This action will prompt the window shown above.
Click “OK”.
Finally, click “Request Permission” in step 3, then click “OK, I’m done.” You should now be able to edit files through the ProVide HTTPS interface.
Installing ProVideLink on a PC #
The first time you attempt to edit a file using ProVide’s HTTPS interface, you will encounter a popup. Click on the “ProVideLink.msi” link to download the ProVideLink software to your computer. Once the download is complete, navigate to the download location and run the ProVideLink.msi file.

Click on the “ProVideLink.msi” link to download the ProVideLink software to your computer. Once the download is complete, navigate to the download location and run the “ProVideLink.msi” file.
Click Next

Click Install

Click Finish

You should now be able to edit files through the ProVide HTTPS interface. You might encounter a popup as shown in the picture above. If you prefer not to see this popup every time, you can click “Always allow.” This will set ProVideLink as the default application for opening these files in the future.
If you miss responding to this popup in time, ProVide may prompt you to install ProVideLink again, even if it’s already installed. Simply click “OK” in ProVide and try again.
Enable ProVideLink as the administrator of the server. #
To enable ProVideLink for your users, please follow these steps in the administration interface:
1. Navigate to the HTTP(S) menu.
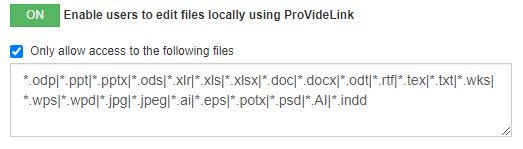
2. Switch “Enable users to edit files locally using ProVideLink” to ON
3. (Optional), Enable “Only allow access to the following files” and set the filetypes you wish to allow.
See picture below to see how to format the filetypes.