There are several ways to upgrade ProVide.
Manual update through the administration interface and checking for available updates. #
Updating ProVide is simple! Just follow these steps:
Open the ProVide Administrator interface.
Click the “Check for Update” button (you can find it where shown in the image below).
If a new version is available, a window will appear showing:
- Your current version
- The latest available version
- A change log listing what’s new or improved
From there, you can decide if you’d like to update to the latest version.
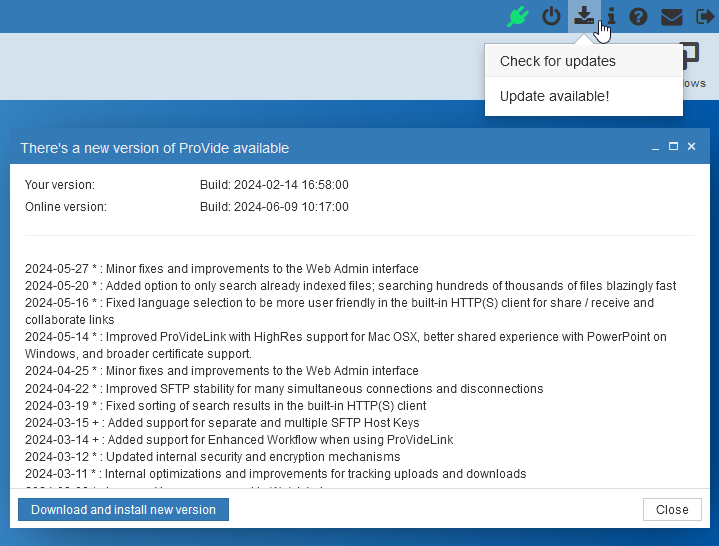
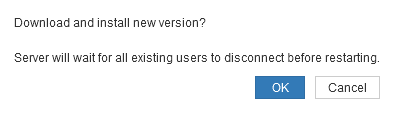
To update, simply click “Download and install new version.”
A confirmation message will appear asking if you want to proceed. Click OK to start the update.
Important:
ProVide will not update while users are connected to the server. The update will wait until all users are disconnected. Once that happens, the server will briefly go offline (for less than a minute) to install the new version, and then it will automatically restart.
If you want to apply the update immediately, you can force the update by manually disconnecting users. See the “Disconnect users for update” section for instructions.
Enable Automatic Update #
To Enable Automatic Updates In the ProVide Administrator interface, click Details and then Automatic Updates as shown in the image below.

The window shown below will appear.
To enable automatic updates:
Click the Off switch under “Enable automatic updates” to turn it On.
Then click OK to save your changes.

Just like with manual updates, ProVide will not automatically update while users are connected to the server. Once the last user disconnects, the update will proceed. The server will briefly go offline to install the update, and then it will automatically restart.
Manual Update #
To perform a manual update, follow the steps in the ProVide Server Installation Guide.
When upgrading ProVide (as opposed to installing it for the first time), keep the following in mind:
- You don’t need to set a new administrator password, unless you want to change the current one.
- Install the new version in the same directory as your existing ProVide installation. This ensures all your settings and data are preserved.
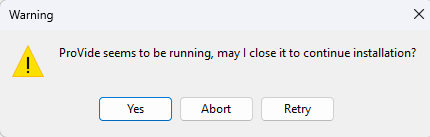
- During installation, ProVide will ask you to close the currently running version. This is necessary so the new version can replace the old one.
Note:
When you close the running instance, the server will go offline temporarily. The setup will automatically restart the ProVide service once the update is complete.
Manual Update on a server without internet. #
Download the ProVide setup file from our website using a computer with internet access.
Run the setup file, but cancel the installation when you reach the main setup window.
A prompt will appear (as shown below). Click “Yes” to confirm.

After canceling the setup, go to the location where you downloaded the ProVide setup file.
You’ll now see a folder named “ProVide Setup (64-bit)” or “ProVide Setup (32-bit)”, depending on the version you downloaded.
Open this folder and copy the ProVide.exe file to your offline server.
To install the update:
- On the offline server, stop the ProVide service before running the update.
- To do this, open the Start menu, search for “Services”, and open the Services window.
- Find “ProVide Service”, right-click it, and select “Stop.”
Once the service is stopped, you can proceed with the update using the copied ProVide.exe file.

Navigate to your ProVide installation folder (default location:C:\Program Files\ProVide).
Rename the existing ProVide.exe file to something like ProVide_old.exe.
This keeps a backup of the previous version in case you need to roll back.
Copy the new ProVide.exe (from your earlier steps) into the same folder.
Start the ProVide service:
Open the Start menu and search for “Services.”
In the Services window, find “ProVide Service.”
Right-click it and choose “Start.”
That’s it—ProVide is now running the updated version!
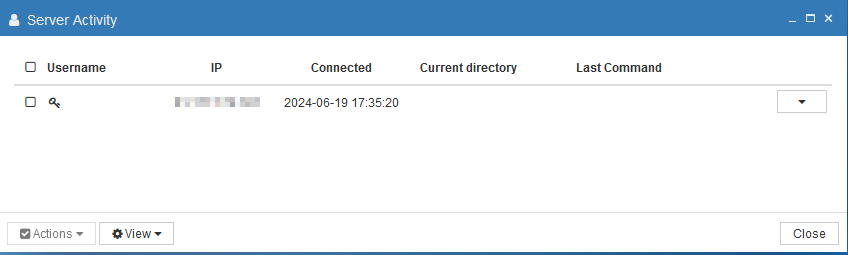
Disconnect users for update. #
In the Server Activity window, you can see a list of currently connected users—identified by their Username or IP address.

If you want ProVide to update immediately, you can manually disconnect users from this window. Once no users are connected, the update will begin automatically.
Important:
Disconnecting users will forcibly remove them from the server, which may interrupt ongoing transfers or sessions. Use this option with caution.